Add a connection
This page creates one connection from scratch, end to end. It assumes OpsPilot is installed and running, and that you can already reach the target host from your workstation — OpsPilot installs nothing on the target.
Open the dialog
Click + new connection above the connection list. Give the connection a connection name — this is the label you will see in the list and in the tab bar, so name it after the machine's role rather than its address.
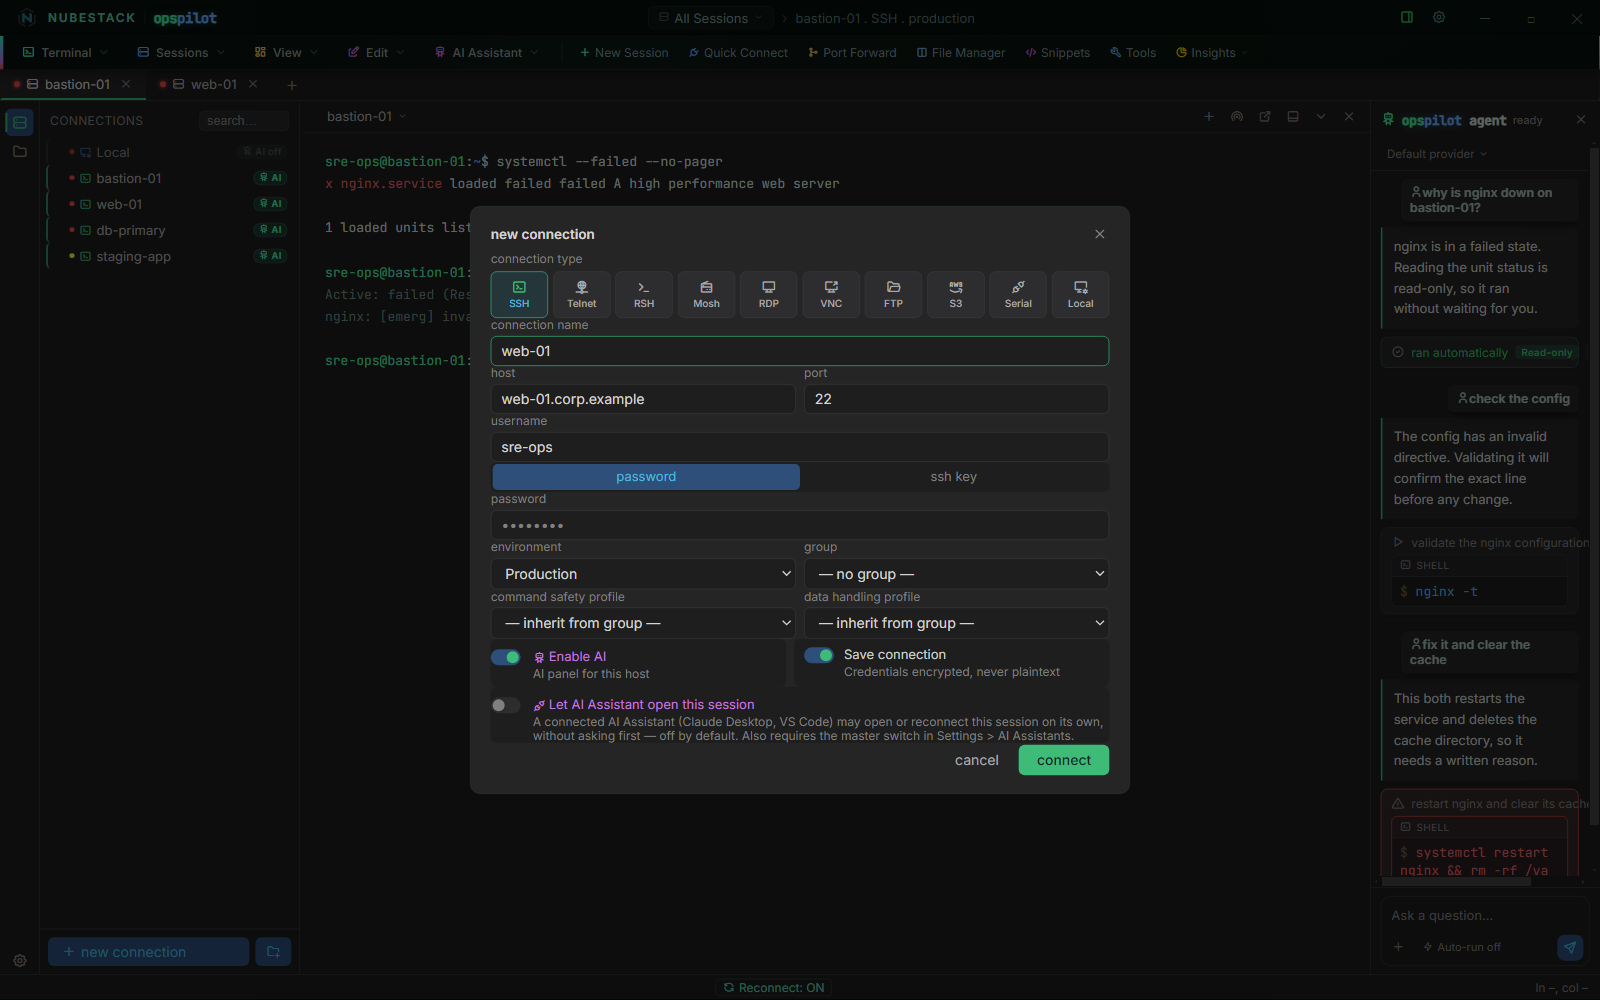
The new connection dialog. The fields shown change with the type you pick: host, port and username appear only for the types that use them, and the password / SSH key toggle appears only for SSH and Mosh.
Pick a type
The type is the first decision, because it determines which of the remaining fields exist at all. SSH is the default and the primary path. The full set is in Connection types; the short version is that a type opens either an in-app terminal tab, an embedded desktop, a file browser, or an external application.
Fill in host, port and username
- host — an address or a hostname. Not shown for AWS S3, Serial or Local, none of which have a network host.
- port — pre-filled with the type's default: 22 for SSH and Mosh, 23 for Telnet, 3389 for RDP, 5900 for VNC, 21 for FTP. Change it if your estate does not use the default.
- username — shown for SSH, Mosh, RSH, RDP and FTP. Telnet does not carry a username in the connection definition; you authenticate inside the session as the device prompts you.
Authenticate
How you authenticate depends on the type:
- SSH and Mosh show a password / ssh key toggle. The key path takes a private key file and a passphrase (if any).
- RDP, VNC and FTP show a single password field.
- Telnet, RSH, Serial and Local need no credentials in the dialog at all.
Whatever you enter is encrypted with the operating system credential store, not written to a plain-text file. See Credentials.
Some types add their own fields below the authentication block — a Windows domain for RDP, an initial path for FTP, a target selector for VNC. Those are covered on the type's own page, and every field in the dialog is listed in the connection fields reference.
Environment
environment tags the connection with a colour-coded label, and it does two things:
- It colour-codes the connection everywhere it appears — the list, the tab bar, the session header. A production host that is visibly red is harder to mistake for a staging host.
- It is how safety policy gets scoped in practice. Environments are the tag you organise the connection list around, and groups — which carry Command Safety and Data Handling profiles — are normally drawn along the same lines.
production and staging are seeded on a new install. You add, rename, recolour and remove environments in Settings → Environments; a connection keeps its environment across a rename, so recolouring or renaming one does not orphan the hosts tagged with it. See Groups & environments.
AI access
Two separate toggles at the bottom of the dialog control what the AI may do with this connection. They are not the same permission.
Enable AI — captioned AI panel for this host — decides whether the assistant may see this session at all. A connection with AI off is invisible to every model and every assistant: its output is absent from AI context rather than redacted or summarised, and no provider setting, prompt or assistant reaches around it. Set the toggle deliberately and check it before you connect — leave it off for anything you are not ready to expose, and turn it on for the hosts where you want a second pair of eyes. What a connection with AI on does and does not send is covered in What gets sent.
Let AI Assistant open this session is the stricter of the two, and it is off by default. It allows an external assistant over MCP — Claude Desktop, VS Code — to open or reconnect this connection on its own, without asking first. Establishing a live connection to real infrastructure is a materially larger capability than reading output from a session a human already opened, so it is gated twice:
- A master switch in Settings → AI Assistants, under session access, which is off until you turn it on. It is checked on every call, so switching it back off takes effect immediately.
- This per-connection toggle. An assistant is only ever offered the connections you have turned it on for, and the permission is re-checked when the assistant actually asks — a stale connection id from before you turned it off is refused.
Neither toggle gives the assistant a shell. Opening a session is not running a command; commands still go through the approval gate.
Save and connect
There is no Save button. The dialog's primary button is connect, and it connects immediately. Whether the connection is also stored in the list is decided by the Save connection toggle beside it — captioned Credentials encrypted, never plaintext — which is on unless you turn it off.
So the normal flow is: leave Save connection on and click connect. The connection appears in the list, and from then on you double-click its row to connect it again. Turn the toggle off for a one-off you do not want kept.
If a connection fails to open, the failure is reported with the target's own error text rather than a generic message — see Troubleshooting.
See also
- Connection types — what each of the ten types opens
- Groups & environments — where policy is applied
- Credentials — how secrets are stored
- Connection fields reference — every field, per type